Welcome!

This is just one example of how you might use WordPress.com for your EDTECH Learning Log. Remember, the cool part about this activity is that you can easily transform this learning log into your final EDTECH Portfolio–a HUGE time-saver.

Take advantage of the WordPress support page http://support.wordpress.com and our excellent EDTECH community for answers to your questions.

Format and organize this learning log as you want. And remember, you can create a new WP site and import our file, which includes all of the AECT categories, another time-saver.

Experiment and play around with this valuable and powerful tool.

By the way, I clicked the Visibility: Public link and selected “Sticky” so this post would always remain at the top. Experiment and enjoy WordPress. It’s a powerful tool.

513: Final Class Reflection

Course Syllabus 

As far as proving useful and interesting, Multimedia (the final course in my M.E.T) ranked near the top of all during the degree. The text that we used, which was wise to continually include and explain the research underpinning all of the specific multimedia concepts, was thorough and straight forward. 513 will be a course whose text I can see myself going back to again and again, as it will make the content that I produce that much better.

I believe that the videos or the worked example may prove most useful, and as such, were my best. It’s also important to know that given the huge amount of videos that we consume, 3-7 seconds should be the limit for any given shot. I tried to keep to that in my video. My intention is to allow the lessons learned in this course be a jumping off point so that I can  shift to year-round content creation, and videos will be a main media that I’ll use.

The inclusion of extraneous information is detrimental to learning. This will be my mantra moving forward in the classroom. There have been times in presentations where I included unnecessary items, quips, pictures, and there was no reason for me to have done that. I know understand that cognitive load mustn’t be too heavy or students will have trouble focusing on the information that they are to learn.

Overall, this course will stay with me over the course of my professional life. I look forward to being a contact person at the schools, districts (and countries) in which I work so that I can spread this important information on multimedia.

Worked Example Screencast: Project 5

Worked Examples are a clever way to allow students to work through problems  in non-synchronous learning environments. Like other topics that we have covered during the Multimedia course, preparation and consideration of real-life research will make your Worked Examples be more helpful for students. Elimination of extraneous non-essential information is also crucial.

First off, teachers need to model problem-solving skills by taking a problem, breaking it into manageable chunks, so as to not cause cognitive overload, and then working through it. The way that my problem worked was that I broke down the steps, but was not excessively overt so that students with different ways of arriving at the answers still have the latitude to do so. Being overly prescriptive may be detrimental to a learner’s understanding of how to work through the problem.

I opted to make four different videos using Google Slides and Screenflow, which is a screen capturing software. When topics are broken down in this manner, they allow the student to remain active in the construction of knowledge. Much like scaffolding, in subsequent videos, I added some reflective questions and hints so that students who require a bit of additional help have it.

Design Notes

  • Simplify and only use one image (it was a Creative Commons image)
  • Break steps down into parts:
    • Take out major information that must be calculated (file size, transfer speed)
    • Get data to same units
    • Explain how units can be determined giving a chart (I made one)
    • Remind that 8 bits = 1 byte
    • Calculate file size, which usually will involve multiplying by 8.
    • Divide file size by transfer rate to get the time in seconds
    • Remember it may be more meaningful in minutes
  • Do three different practice questions, with the final one being one the student will solve entirely alone
  • Include tips and hints for the first two practice problems
  • For the last one, give the answer and also explain how it was obtained at the end.

This was a useful module, because it starts us on the path of creating out own professional content that can be used in class or as tech integration specialists. The book was an invaluable source, as it offers tips to insert a “continue” button to check for understanding.

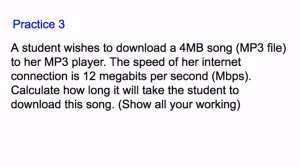
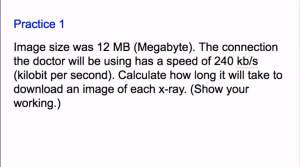
Please click the images below to go to the worked examples.

Screen Shot 2016-08-14 at 20.05.31 Screen Shot 2016-08-14 at 20.28.35

Screen Shot 2016-08-14 at 20.29.48 Screen Shot 2016-08-14 at 20.30.52


Digital Story

For my Digital Story assignment, I chose a topic that I thought would be useful for students who are beginning the two-year International Baccalaureate (IB) program. Students coming into Junior Year (11th Grade) don’t realize that their study habits need to change drastically if they wish to maintain good standing at school and be on their way to do well on the IB exams.

In lieu of creating a traditional narrative, I took the concepts of establishing a point early on, using a well-written script and including images that are directly related to the topic. I searched for the images using the Creative Commons tag, which allows for non-commercial reuse. As in anything creative, one can always improve, and while I think the video is ok, it certainly could be improved by making all of the clips from videos I took at my school. We’re currently on Summer break, so this was impossible.

At any rate, please enjoy and give helpful feedback directly onto the YouTube clip.

YouTube Video

Coherence Analysis

The Coherence Principle holds that extraneous information in a lesson – be they words, audio, complicated graphics – overload a learner’s cognitive channels and cause learning to be less effective (Clark & Mayer, 2008; Moreno & Mayer, 2003). The adage of Keep It Simple, Stupid or KISS, applies in teaching, as anything that’s not critically important to a lesson is best left out; learning will be improved as a result.

A personal anecdote that I can relate occurred in an anatomy class that I took. I remember feeling as though I learned better when the body-part graphics were simplified and contained less detail. I can remember a different feeling, however, when studying the brain. The image was extremely detailed and it seemed harder to learn the parts of the brain with the additional detail in the drawing. While I couldn’t verbally express what the reasons were for this, I now now it’s related to a successful application of the Coherence Principle. In their book, authors Clark & Mayer include an image of a heart that’s drawn more lifelike and another that’s less anatomically accurate but with cleaner lines (2008). The authors’ research found that even additional detail in the heart illustration would make the concepts less easily learned. It’s likely that those involved in creating the anatomy textbook were wise in how they had the illustrator draw some diagrams and images.

I regret that I’m culpable of including seductive details, which are interesting but irrelevant details included in a multimedia presentation that attract students’ attention (Clark & Mayer, 2008). As the authors said often happens, I believed too that the information, which was relevant to the topic but not necessary for them to commit to memory, might get them more interested in the topic. Research has found, however, that these details pull students’ attention away from what needs to be learned. I violated the Coherence Principle and am guilty of impeding student learning through my ignorance, something which is good to know now but would’ve been important to know about prior to now.

The Coherence Principle is in line with several other topics that we have covered thus far in class. At its core, extraneous information that is not directly relevant to the learning objective is to be left out of teaching, as research has shown it to overload cognitive channels and allow students to learn less effectively. This reminds me of the limited capacity assumption, which is the notion that learners are only able to actively process a limited amount of new information (Clark & Mayer, 2008). Especially when a lesson contains a lot of new information or information which learners may find complex, simplification and “only the essential” ought to be the rule. Moreno and Mayer found that the arousal theory, which is related to and I called seductive details previously, is basically the opposite of the Coherence Principle (2000). It isn’t that a snappy, fascinating, unnecessary bit of information will improve student learning; it will harm students’ ability to learn. What teachers and those who produce multimedia presentations for learners must remember is that the objective isn’t entertaining but a cohesive, effective environment in which students learn only what is slated to be learned according to objectives. Discuss the relationship of the Coherence Principle to other Multimedia Learning Principles examined thus far in your readings. I plan to make a presentation to other teachers at my school to convey this information, and also make a piece that can be watched at teachers’ leisure. In today’s school climate, in which students often present their work, it is important for students to know about the Coherence Principle and how to best make their multimedia presentation. These skills can be applied across curricula, and perhaps the information would be best added to a life skills class.

Personally I want students to be effective and meet learning objectives in my classes with as few distractions as possible. Given that the authors have studied student learning and found that learning isn’t as effective with extraneous information, I would follow their recommendations. Certainly studies need to be replicated many more times so that the argument for change can be iron-clad, because less than ten studies on a particular subject would be woefully inadequate to drive a shift across the vast educational landscape. However, the information, even with only a few clinical studies, has demonstrated statistical significance in the differences in learning between the groups that had extraneous information included and those that didn’t. This is common sense knowledge, even without knowing that humans are only able to actively process a certain amount of information for learning. All in all, I’m grateful that I have learned about the Coherence Principle and intend to adapt my teaching to reflect its recommendations.

References

Clark, R. C., & Mayer, R. E. (2008). E-learning and the science of instruction, 2nd edition. Pfeiffer: San Francisco, CA.

Mayer, R. E. (1999). Multimedia aids to problem-solving transfer. International Journal of Educational Research, 31(7), 611-623.

Moreno, R., & Mayer, R. E. (2000). A coherence effect in multimedia learning: The case for minimizing irrelevant sounds in the design of multimedia instructional messages. Journal of Educational Psychology, 92(1),  117-125.

Moreno, R., & Mayer, R. E. (2002). Animation as an aid to multimedia learning. Educational Psychology Review. 14(1). 87-99.

Podcast

Screen Shot 2016-07-24 at 16.33.46

Podcast Assignment

I decided to do a podcast for a topic that I cover in an IB class called ITGS. ITGS is a two-year course of technical content, and by the time students have to take the culminating exam, they have to review to make sure that they can recall all of the information to score well.  The podcast was one way for students to go over topics on their own during their second year and specifically during the reading weeks leading up to the IB exam. 

My intention for the arrangement of the podcast was to go through the main parts of the topic, which in this case was networks. I added some mnemonic devices that I thought might be helpful for students on some of the points that students forget. For instance, BARS is an easy word to help students remember the benefits of having a central server (Backup, controls Access, easy Repair, Security easier). 

It should be said that there may have been a different way to do this if I had another person to record with me to make it more entertaining. Although I added music and kept to the modality principles, it wasn’t as captivating at times as I would’ve liked it to be. This is the fourth podcast I’ve made on the topic, and while I’ve received a like from someone, it’s only been one like. I think for the next volume, I’d like to change the format to be more in line with the podcast that I reviewed. In that way, students will learn, but the format will be more entertaining for them as well.

Project #1: Static Multimedia Instruction

Overview of assignment

Link to clarify-it presentation using multimedia and contiguity principles:

Exterior shooting for videos

The learning objectives for the “exterior shooting for videos” instructional piece are:

At the end of this lesson, students will know how to set up a simple video shot outdoors.

This project was important to make, as it allowed me practice with the multimedia and contiguity principles of which we studied over the first weeks. The multimedia principle states that multimedia should not be an afterthought but must be an integral part of the lesson. Nothing is superfluous or chosen without intention. All is meant to promote a change in the learner and enable the learner to make connections between the media content and the words. The contiguity principle states that pictures should have writing beside or under them as this has been demonstrated to speed acquisition of new content and skills.

Design Notes: Building Clarify-it Instructional Piece

One of the classes that I teach is video. Oftentimes students struggle to keep in mind the basic principles of shooting outdoors, and so I decided to make a clarify-it so that they could read through it. In my class, I will incorporate this into a lesson in which students will actively construct their own knowledge by going outdoors to set-up a shot and shoot a few different shots using the content.

First, I selected a character, which in this case, happened to be one of my niece’s brightly colored stuffed animal turtles. I then decided to walk around the neighborhood where I currently am to show both examples and non-examples. In video, it’s quite helpful to have non-examples so that students understand when mistakes are being made and then can better avoid them.

I shot all of the still shots using my camera and then edited them using photoshop software. Next, I emailed them to myself and placed them into a folder for the assignment on my desktop. I added all of the photos to the Clarify-it document. My intention was to write down the tips directly next to the example or non-example so that students weren’t confused as to what the shot demonstrated or didn’t demonstrate according to the shooting tips. The lesson is fairly straight-forward and simple, and 9th and 10th graders should be able to follow it and learn.

Discussion: Contiguity and Multimedia Principles

I carefully selected all of my images. Indeed, the images were shot and edited especially for this presentation. In doing so, I minimized extraneous processing by only including the essentials of each shot, which in this case was character and background object. Essential processing was kept at a minimum by chunking the material into different steps. Students might be overwhelmed had I included everything in one slide. In order to augment generative processing, I added essential visuals related to the concepts and ideas of the lesson.

For the first image, I employed a somewhat decorative graphic that didn’t necessarily enhance the message but rather served as an example of what an outdoor shoot may look like. For the other images, organizational graphics were used in which I pointed out what shooting principle was at play in the image. For instance, a distracting background image was circled in a complementary color and then a text box pointed to the image.

I kept to the contiguity principle, as I aim always to do when including an image, by writing text alongside or directly underneath the image itself (within the image on a particular part of negative space that’s unimportant to the shot).


Course reflection

photo of light being reflected off seaWhen looking at the AECT standards, it’s easy to see that this class covers a surprising amount of terrain. Over seven weeks, we built and developed websites, researched & selected the latest & most appropriate websites, apps & technologies for our named course area (ITGS, in my case), and became more sophisticated in our analysis of how everything fits together best. As I don’t want the reflection to go on for eleven pages, I’ve copied the AECT standards that apply to this class and have included them below. They are not few!

I feel proficient and confident that I’d now be able to meet with teachers on the ways to integration tech into their curricula. Much of this comes from the fact that this class, give its exhaustive analysis of everything tech integration moved at a rapid pace. I learned a lot about different tech strategies and tools in education, including how to integrate appropriate instructional software & productivity web-based apps, how web 2.0 can be most effectively harnessed. Also we touched on how assistive hardware and software ought to be used to increase student understanding and construction of knowledge. Plus we focused on the issue underpinning tech integration, which is: in what circumstances do we utilize good apps, software, websites and how do they achieve the best impact possible on student learning, understanding and motivation. Prior to this class, I didn’t feel as confident that I could explain this to a group of professionals, but now I can: A good tech integration specialist is valuable for the way that s/he researches, applies and integrates tech in a thoughtful manner. And in a way that’s both connected to the curriculum and facilitates student learning across the spectrum of learner profiles.

The course text, along with a massive list of websites and apps, clearly provided the theory of why we integrate technology in the classroom. My projects were built only after I processed Roblyer’s helpful ideas on the latest educational theories. The two key ideas are that student-centered learning is the preferred environment and that constructivist, “knowledge building” strategies will yield the best results. Roblyer mentions in his book, Integrating Educational Technology into Teaching, that we teach the way that we have been taught. In my case, I was instructed almost solely in the “teacher as sage” style, in which the teacher was the sun and us students were planets meant to soak up the rays of knowledge and reflect it back to him/her to demonstrate learning. In the information age, the notion is that students must take responsibility for their own knowledge building, while teachers guide them in their educational journey. Technology integration motivates students to learn more and allows them hands-on access to the best tailor-made collaborative authoring tools.

List of AECT Standards that align with 541

2.0.1 Select appropriate media to produce effective learning environments using technology resources.

2.0.2 Use appropriate analog and digital productivity tools to develop instructional and professional products.

2.0.3 Apply instructional design principles to select appropriate technological tools for the development of instructional and professional products.

2.0.4 Apply appropriate learning and psychological theories to the selection of appropriate technological tools and to the development of instructional and professional products.

2.0.5 Apply appropriate evaluation strategies and techniques for assessing effectiveness of instructional and professional products.

2.0.6 Use the results of evaluation methods and techniques to revise and update instructional and professional products.

2.3.1 Design and produce audio/video instructional materials which use computer-based technologies.

2.3.2 Design, produce, and use digital information with computer-based technologies.

2.4.1 Use authoring tools to create effective hypermedia/multimedia instructional materials or products.

2.4.4 Use telecommunications tools such as electronic mail and browsing tools for the World Wide Web to develop instructional and professional products.

2.4.5 Develop effective Web pages with appropriate links using various technological tools (e.g., print technologies, imaging technologies, and video).

3.1.1 Identify key factors in selecting and using technologies appropriate for learning situations specified in the instructional design process.

3.1.2 Use educational communications and instructional technology (ECIT) resources in a variety of learning contexts.

3.2.1 Identify strategies for the diffusion, adoption, and dissemination of innovations in learning communities.

3.3.1 Use appropriate instructional materials and strategies in various learning contexts.

3.3.2 Identify and apply techniques for integrating ECIT innovations in various learning contexts.

Reflection on Async Lesson.

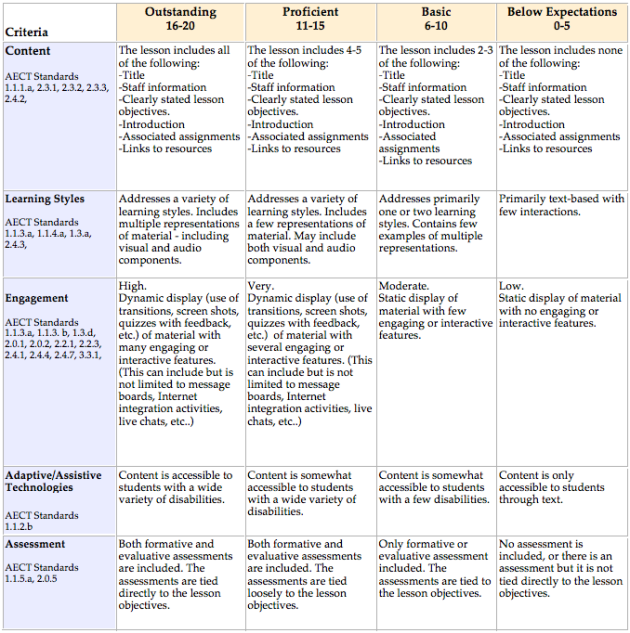
rubric for 521 class

I think that I did a thorough job with my asynchronous assignment. My aim is to always use a number of different strategies to make the lesson as interactive and action-based as possible. I feel like, especially with our block-class structure, students have a tendency to get sleepy when they’re sitting at the computer for too long. For this reason, I’ve tried to mix up the activities so that students have to take a break every now and again.

My assignment included both formative and summative assessments in the form of peer critique, reflection journals, and rubrics for the pieces that they turned in. I want my students to feel responsible for their learning, and I think that reflections allow students to process their learning using metacognition.

I really appreciated this assignment because it has given me a head start in planning for a class that I have to start giving at the end of the month. I appreciate the rubric that we’ve been given, as it allows me to know exactly where I need to go with my work. I’m sure my students feel the same way.

Learning style strategies

Visual Learners

My learning style can best be described as visual. I took this test, and i stumbled across this simple list, which includes some strategies that I use, including:

-highlight material using different, color-coordinated highlighters. Reassemble these highlighted notes in a more meaningful way

-draw graphic organizers – not using digital technology, but physically draw them with your human hands. 🙂

-write and draw things to test yourself for understanding. Draw on a piece of scrap paper when you take a test.

Here are some other technologies that can help visual learners:

Visuwords – online graphic dictionary that makes concepts more visual. Check it out.

Scooch – free slideshows to make words come alive. You must register for this though.

Google slides – pictures and concepts can be dropped on to google slides to make visual learners interact with the material in a better way.

Bubble.us – flash-based software that helps to brainstorm visually

Auditory Learners

Auditory learners are able to take spoken information, process it and learn. In classes that give lectures, these students benefit by being able to take what is said and actually learn it without the struggle that say, the visual learner experiences.

-read things aloud. (stop and read this aloud:) auditory learners learn best when they hear things spoken.

-use the voice memo feature to record thoughts and then play them back. The important part of this equation is that learners actually play back the audio.

Audacity – This is a free, web-based software that allows you to record voice and play it back slower or faster as you see fit. For those audio learners who are more accelerated, maybe they amp up the speed.

Podomatic – Podcasts galore at this searchable site that includes many educators who have uploaded their lectures and lessons

BRB, TBH, BTW, BC, W, UR, LOL, NP, YW, B/T

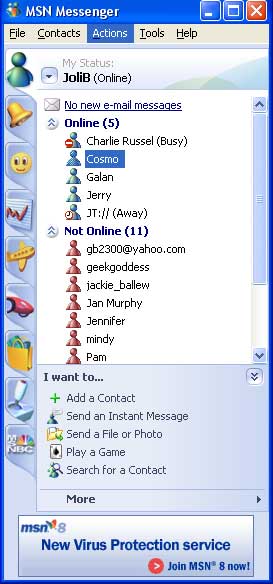
msn messenger photo

When I started chatting way back when, I was a language purist. I could type reasonably well and figured that I might as well spell the whole word out rather than these shortcuts that confused people. Back then, there seemed to be a preponderance of B4s, L8Rs, GR8s, and the flipping between numbers and letters never made any sense when I could spell the entire word faster than looking down and locating it. (yes on phones, you used to have to peck the number “2” button a pair of times and then the “3” button twice, and so on to completely spell out a word, but I’m talking more about qwerty keyboards. MSN Messenger and the like)

Nowadays, in a world of SMS messages (text in the U.S.), shortened text fields and so much communication it can make one’s head spin, I have adapted and freely use all of the abbreviations above, with the exception of TBH (to be honest) because I’m always honest. In class applications, the 521 class students and I were in agreement that it’s fine to use acronyms and light-hearted emoji, emoticons when chatting and in emails, but never in discussion boards or on any assignment submissions. I think this is a good to increase the writing precision expected on an academic level.

For those who don’t agree, unfortunately, you might want to let go of the past and embrace the fact that by and large busy people, young and old, would rather write down a pair or three letters than a whole word. Many times we respond to texts when we’re doing something else, and the abbreviations lessen the time we take away from our families, our jobs our class assignments.

Could you figure out all of the above abbreviations? Do you use many of them with your friends? If you use TBH, aren’t you just adding three letters unnecessarily because you don’t lie?